Saturday, 8 October 2011

From kudu to bogorbes

There is too much going on at present for me to write any blog entries on arcane biomechanical biomechanics on other planets. For once, I will focus on some personal aspects behind a Furahan animal, an idea suggested by two anniversaries of past events. Twenty years ago I visited sub-Saharan Africa for the first time. I wished to see animals in the wild, reasoning that the slow degradation of the world's biodiversity would render such visits meaningless in time. I wasn't wrong about the degradation, but it is not too late for a visit yet.

I had a great time, camping in the wild, seeing animals as they are supposed to be, and revelling in an over-abundance of beauty. Any readers who have been to Eastern of Southern Africa may recognise African influences in my paintings.

Click to enlarge; copyright Gert van Dijk

Here is a sketch proving the point: a group of predators is enjoying their meal on a steppe or savannah, watching some large herbivores and being watched in turn. The scientist in me insists in adding that this is not a typically African scene: similar scenes have been played out on European, Asian, American and probably Australian steppes and savannahs countless times, with different species in the prey and predator roles for each time and place. But it is only in Africa that such biomes have not been wholly replaced by wheat fields, livestock pastures or the human habitat, explaining the strong association of such scenes with Africa. In my case, the associations have a strong personal flavour as well.

That visit changed my life because I met my wife to be during that trip. We got married a few years later, and visited Africa several times afterwards, something I stopped doing after she died, also quite some time ago. At the time she was as enamoured with the wildlife as I was. I returned home earlier than my travel companions, and immediately sent off countless rolls of film to be developed (it was 20 years ago). I sent a few prints to my fellow travellers, and decided to tweak one I would sent to my later wife in Paris, where she then lived.

Click to enlarge; copyright Gert van Dijk

I took out my oil paints and altered a photograph of a greater kudu, an antelope, standing on the shores of Lake Bogoria in Kenya. I added a third pair of legs in the front as well as a new neck and head, and masked out bits of leftover kudu. I varnished the photograph so my handiwork was not too apparent. I sent my 'cooked kudu' to her, and she had a good laugh with it. She mixed the photograph with photographs of her own of that trip. A friend of hers went through her stack of vacation photographs, said "Tiens, il y a six pattes" ("Hey, there's six legs") on encountering the photograph and then simply continued flicking through the pictures, without apparently realising that a large six-legged herbivore was more than just a trifle strange, in Africa or anywhere else...

My wife later dubbed the animal a 'bogorbes' (Venia lauta), and it has been part of the Furahan fauna ever since. You will find it on the cover of Sigismunda Felsacker's travelogue "Paleo Days" (see the New Hades book shop), and the blurb text there was written by my wife; not everyone in the Furaha universe is fictional.

Saturday, 1 October 2011

"Maybe if you stick on another leg at the end of the tail?"

Designing a novel way of walking for extraterrestrial animals is complicated. I tried my hand at designing gaits for large hexapodal creatures (see the main Furaha site), radial walking patterns and also explored walking with an odd number of limbs. In all such efforts the trick is to achieve something that looks interesting as well as believable. In the context of speculative biology 'believable' is balanced somewhere between 'Earth normal' and weirdness. One thing is clear though: you cannot get a believable result by assembling an animal of leftover bits and pieces, such as just sticking an extra leg on the end of a long tail.

Or can you? As usual, evolution on Earth manages to come up with designs that, if invented by a mere human, would fall in the category of unacceptable weirdness. The following video shows an insect that looks odd, but oddness by itself is fairly normal for insects. Look how it moves: most of the time insects walk with a double tripod gait: the front and hind legs on one side move in unison with the middle leg on the other side. When these three legs touch the ground they form a stable tripod. The other three legs meanwhile are lifted and swung forwards, and when they touch the ground, they will form a tripod as well. The two tripods are exactly out of phase, so when one hind leg is on the ground the other should be in the air. Now have a look at the hind legs of this interesting beastie, a trilobite beetle from Borneo. The original is here.


Its pairs of legs are in phase, a bit unexpected, but slow-moving insects can do that. But that is not all: it uses the tip of its abdomen as an additional unpaired leg. It curves its abdomen forwards, plants its 'leg' on the ground, and pushes backwards with it. Anatomically this may not be a proper leg, but functionally this animal certainly uses seven legs: it's a heptapod!


Here's another video. The beginning shows that this species can also walk with the front legs out of phase, but you do not get to see all legs that well. It is clear though that it uses the end of its abdomen as a seventh functional leg.

Why do these animals walk in this weird fashion? The gait does not look quick or agile. In fact, the animals appear to be rather slow and clumsy. A bit of research points to an answer. These 'trilobite beetles' are said to belong to the genus Duliticola, and using Google with that name results in a paper starting with the brilliantly surrealistic sentence 'There are two trilobite larva species in Singapore.' Apparently, the male and female of these species differ greatly in shape: the males look like typical beetles while the females are neotenous. Now neoteny is a condition in which sexual maturity occurs while the body is still in a larval stage. The axolotl is a famous example, and humans are sometimes thought to display neoteny as well.

But what does that mean for the strange gait of this apparently female insect? Well, it looks a bit like a regular adult insect, with a hard exoskeleton and all, but its general body shape is in fact that of a caterpillar. Caterpillars display complex gaits, not too surprising if you think about their body plan: six regular legs that will become the legs of the adult insect, a number of 'prolegs' (the knobby stumps further along a caterpillar's body), as well as final 'anal prolegs'. All of these are attached to a boneless body, providing endless opportunities of combining walking with stretching of the body. So that explains the trilobite beetle's walk: its' a caterpillar in disguise. Never underestimate insects' capability of oddness.

There is of course more to be told about caterpillar movement. In fact, at least in some species their gut moves inside their body before the outside follows up. The following video show that very nicely as well as the combination of body stretching with using legs. Perhaps there is a risk that you will learn more about caterpillar movement that you bargained for, but personally, I love details.

Sunday, 11 September 2011

It's a bird, it's a plane, it's a... flying squid!?

A year ago images of flying squid were in the news, including two short papers in Scientific American (here and here). Somehow I missed them at the time. Perhaps they are old news to readers of this blog, but I thought they were still very interesting. After all, cephalopods (octopus, squid and the like) attract attention from just about everyone with an interest in speculative evolution. I think Dougal Dixon was the first to have them venture out on land, a concept followed so often that it has become a cliché (but which does not mean that it was not a great idea at the time). I criticised the concept of 'walking with tentacles' in a series of blog entries later, reasoning that tentacles are so poorly designed to withstand compressive forces that evolution would turn them into limbs (here are the first, second, third and fourth posts on the subject). By the way, cephalopods with jointed legs would, for me, be much more interesting than ones painfully plodding about on tentacles. Unfortunately, their renal system is probably a much larger hindrance from them leaving the water than having tentacles; but I digress.

Cephalopods have jet propulsion, also a rather interesting feature to have aboard, and one that also crops up regularly in discussions on alien animal design. Some went so far as to equip animals with fuel-burning jets, something belonging in the needs-a-lot-of-faith category.

So now it turns out that some squids can leave the water, much as flying fish do, and probably for the same reason: to escape predators. And they use jet propulsion to do so. I wonder how people would react if squid did not exist and I would invent an animal with a double set of propulsion organs, fins as well as a jet: "What, two means of propulsion? That is improbable and inefficient!" Have that followed by the remark that they can also use their fins as wings and fold up their grasping organs to have a second pair of wings: "He's lost it this time!". Facts are often stranger than fiction, and flying squid are a prime example.

Internet searches revealed more pages and photographs of flying squid,including the following two ones. I checked two books on cephalopods I already had, and one book mentioned that the family Ommastrephidae is in fact known as 'flying squids'. The other book specifically mentioned that the fins are 'not especially well modified for gliding'. It seemed I had missed all of that.


This is a large image found here; The blogger program would not let me import all of it, so I had to cut off portions not showing squid. Even so, you may have to zoom in to see them properly. Some squid trail a stream of water behind them, that appears to be breaking up into drops in some cases. The text mentions that these images were taken as a series of rapidly taken images, and that this time series allows calculation of how fast the squid moved. That is obviously true, but unfortunately the results of those calculations were not stated, which is frustrating.


Click to enlarge; from: Bartol et al, Integr. Comp. Biol. (2008) 48 (6): 720-733

Squid squeeze a jet of water out of a tube, the 'siphon'. The image above nicely shows that the siphon can be turned around allowing the squid to move in either direction. The fins at the end of the body are a normal part of squid anatomy. Squid use both their fins and their jets to move around. The principle of jet propulsion has to do with actions and opposite reactions: pushing away a mass with a certain force results in you undergoing an equal force in the opposite reaction. The force gets bigger the more mass is pushed away and the faster it is propelled. In jet engines air streams in to the engine and out of it continuously, but in squid the propulsion is 'pulsatile'. The water is held in the mantle cavity, surrounded by muscles; when these contract water is forced out. Afterwards the muscles relax, the cavity expands and sucks in water for the next cycle. On the whole squid jet propulsion is nowhere near as efficient as swimming with a tail is, as fish do. Recent calculations suggest it is not as inefficient as formerly thought, but squid still do well do use their fins as well as their jet propulsion system. In fact, they may be better off for having two propulsion systems. I found some interesting material on that subject in a free scientific paper on the subject (from which I took the diagram above as well).

Click to enlarge

This image, found here, shows one flying squid in close up. The animal is flying towards the left. The image suggests that the fins are held in a V-shape, with the tips directed upwards. Holding wings like that is a design trick to prevent rolling about the body axis: when the animal rolls to one side, the wing on that side becomes more horizontal, so it will generates more lift. The other wing becomes more vertical and generates less left. The two effects counteracts the roll and help stabilise the body. At the other end of the animal the tentacles are held in a symmetrical way in a horizontal plane, and there appears to be a membrane between at least some tentacles. This position can only mean that the tentacles act as another wing. I cannot see on the large image whether the tentacle-wings are held in a V-position as well. The close-up seems to suggest they are not. So the 'flight plan' of the flying squid consist of two pairs of wings positioned far apart, with a long body between them. Now where have I seen that before?

Click to enlarge; copyright Gert van Dijk

Actually, only here, as far as I know. The Furahan Seasoar can be found on my website. I developed it consciously in an effort to see what could be done with a four-winged body plan. I reasoned that placing the wings far apart would place relatively much mass at the ends of the animal, making it more difficult to rotate to the left and right. The design would be stable, though, good for long and energy-efficient flights. In fact, I made a paper version once that flew quite well (which gives me an interesting idea for a future post...). The front pair of wings are held in a V-shape, but the hind pair are not. In truth, I did that only because it looked good, and I never stopped to think why one pair should be held in a V-shape and the other not. That arrangement looks a lot like that of the flying squid. Perhaps it does serve a purpose besides looking good.

The large image shows trails of water behind the squid. Does that mean that the squid are actually using jet propulsion to power their flight? Yes and no. Maybe. On the one hand it is certain that the jet allowed them to accelerate enough to leave the water, where resistance against movement is very large. That same force should have a stronger propulsive effect in air, which offers much less resistance to movement than water. On the other hand, weight is not a big problem in water, but it is in the air. Any water carried into the air to serve as 'ejection mass' for jet propulsion increases the mass of the animal and will therefore impair the squid's flying ability considerably. The good part of that is that the water is squeezed out, so the mass of the squid plus its store of water decreases quickly. As the store of water is depleted the squid gets an extra boost, which helps to propel it. There must be a complex optimum in there somewhere, in which the mass of stored water, the force of propulsion and the moment the squid leaves the water are all factors that, when balanced subtly, result in the best soaring ability. But such thoughts count in the long run of evolution. For an individual squid with a predator on its heels (so to speak), getting out of the water NOW regardless of any optimisation might be the wiser choice.

Friday, 26 August 2011

Between the Morae River and the Red Valley

I discussed Brynn Metheny's 'Morae River' project once before in this blog. The project dealt with life forms in a certain geographical area called 'Solturna'. The animals there at first glance looked like Earth's mammals, reptiles, or fish, so you might think that the Morae valley might be somewhere on Earth. But a closer look revealed small but telling differences in anatomy, so you might think that the creatures perhaps stemmed from a not too alternate time-line and were mammaloid, reptiloid and ichthyoid. But a few animals departed so much from regular Earth stock to make you think that they required an extremely early divergence or an unearthly origin. Brynn gave no clue as how to place her creations, and preferred a fluid interpretation. Earlier this year she unfortunately decided to stop working on the Morae River. But that should those who never visited the site from doing so, as it is a great project even if it is no longer updated.

Luckily she did not stop producing odd animals. Far from it! I gather that she is making 'creature design' her career, which hopefully means that there is much more to come. There are several places where you can admire her work: she has a site on Deviant Art where she goes under the name of LenoreKitty. She has a site under her own name, brynnart.com, as well as one going by the name of Fishhook studio. I selected a few paintings for you to see here, and expect that they will make you hungry for more.


Click to enlarge; copyright Brynn Metheney

The pygmy esorifleu
As you can see, this is an arboreal creature with a strong bill, like a parrot's, and six limbs. The middle pair are placed at the top of the animal and are directed upwards, whereas the front and aft pairs are directed downward. There is also a tail, which looks like it is prehensile. This animal can only be a brachiating carnivore. It looks somewhat like my marblebill, to be found on the Furaha site but also in this blog (here and here). A fairly large design difference is that the esorifleu using its middle pair of limbs to swing from, whereas I chose the front pair. Brynn wrote me that the pygmy was designed for a creature design contest. I think the marblebill and the esorifleu are nice examples of convergent speculation.


Click to enlarge; copyright Brynn Metheney

Elegant hunters
And indeed they are. Mind you, the prey look rather dashing as well. The beaks of the hunters remind me of the mouth of a deinichthys. At first glance their body design seems to say 'bony fish from Earth', with its vertical tail, fin rays, gills and dorsal fin. But then you notice that instead of one pair of pectoral fins there are two, giving a jolt to the idea of what exactly they are. What I do not know is whether you have to know that two pairs of pectoral fins are impossible for that jolt to occur. Anyway, four gill slits is an unusual number as well.
I would like to see more of their prey, whose 'Bauplan' seems much more unearthly. I like the bumps on the front of the flippers. Not many swimming animals have those, but humpback whales have very knobbly leading edges on their enormous flippers, and in their case the turbulence they cause actually seems to help. Is that the end of a siphon I see on their sides? Are those expiratory outlets?

Click to enlarge; copyright Brynn Metheney

'Mamma'
No classification problems here: that's a perissodactyl unguloid, or a hoofed animal with an odd number of toes. But are those concentric structures external ears? Perhaps the animal is not Terran after all...
What I like a great deal about this one is how the animals are not simply shown in side view, but are much more three-dimensional. The calf's head cannot be seen, and the mother's head is turned away a bit as well. This is where the trained artist shows herself, I think.

Click to enlarge; copyright Brynn Metheney

A work in progress
Lacking a name, let's call it a 'wip'. If I see correctly there is just one pair of eyes, and the other markings on its head are nostrils and ears. Even so, this animal is more alien than the previous one, with the sail on its neck and particularly the spikes at the base of its tail. Now what are these doing there? They are not placed well for attack or defence, so perhaps they are for display purposes, and display to members of the same species always boils down to sex. Do the spikes serve to impress other wips, or do they provide tactile stimulation during procreation? I had better reign in my imagination here...
It's a beauty though.


Click to enlarge; copyright Brynn Metheney

Another work in progress
If it is, we might as well label it a 'wiptoo'. It is interesting how this head and neck study immediately evokes the notion that we are looking at a very large animal. One reason must be the relatively thick neck. Large animals need proportionately thicker limbs, and that goes for necks too (see here and here for the reasons). Apparently we are so used to seeing the results of these laws of nature that we immediately draw conclusions from seeing their results. Alternatively, of course, this could be a moderately sized animal from a heavy-gravity world, but I do not think so: its eyes are also small in relation to its body. They seem to be camera eys such as vertebrates have on Earth. While bigger animals generally have bigger eyes, eye size does not increase directly with body size, so large animals have relatively small eyes. As with neck thickness, the observer takes these cues and judges the size of the animal, consciously or unconsciously.
Its skin glistens. You can tell from the linear nature of the reflections that its skin is smooth, and I wonder whether it is wet because it just emerged from a swamp or something similar or because the skin itself is wet or oily. A large animal with a permanently wet skin would need a permanently moist and saturated environment. Perhaps it lives as brontosaurs were once thought to do: in humid steaming swamps.

Click to enlarge; copyright Brynn Metheney

There are no animals on this painting, but the image contains a promise. The website of the Red Valley project is already up, but there's not much to see yet. We are promised that animals will appear there in the Fall, so hopefully Brynn won't keep us waiting too long. She wrote me that she is not going to reveal all about the planet: "I might know details about the whole of the planet and such but as far as my viewers are concerned, I'd like it to just be about this valley." I agree with that sentiment: always leave the viewer or the audience hungry for a bit more, and a hint that there is in fact more does wonders to whet the appetite. She added: "I want the flora and fauna to feel alien enough but I want viewers to relate to them as well."
From what Brynn has done in the past, I think she will succeed. The text on the Red River site also states: "No regions, no classification, just this place as it is." Oh very well, I get the message: I should stop trying to classify these animals to see where they belong and what makes them work.

Hmmm; as if I could...

Saturday, 20 August 2011

It's a Fish! (yes, again...; this one's in 3D, though)

Click to enlarge; copyright Gert van Dijk

This is just an extra post. Regular readers may remember that I tried my hand at ZBrush in the past. I still try it from time to time, but found that it, as everything, takes time to master, and digital painting takes precedence. The ZBrush people keep out churning new options, so I will probably never get around to mastering even the simpler elements. Pixologic, the same firm that produces ZBrush, now offers a similar program but completely free: Sculptris. It offers only a few controls, which really helps to learn it. It is very impressive. The controls are the same as those of ZBrush, so experience with one program helps the other. I could not resist trying it, and found it a pleasure to work with. Go to the Pixologic site to see what can be done with it, because my meagre efforts only show what you can do with it in one evening. It is very useful for 2D artists who do not plan to go into 3D, becaue it is easy to sculpt a rough shape to help get the perspective right.

Click to enlarge; copyright Gert van Dijk

So here is a Fish, of the Fishes IV type; I showed one before. I painted four now for The Book, and will not publish these paintings here on the blog. But having done that, Fish IV anatomy came natural to me, and here it is: six flippers, usually attached higher on the body as you go aft, a large head merged without a neck to a stiff body, and three gills on each side with separate inlets but a fused outlet. You knew about the four eyes and the four jaws. As I said, typical Fish IV anatomy.

Click to enlarge; copyright Gert van Dijk

Click to enlarge; copyright Gert van Dijk


---------------------------------------------

P.S. As Luke remarked in the comments section the Fish shown so far are fairly large. Aren't there smaller ones? Yes, there are. I had realised I had a tendency towards larger ones, so I explored the possibilities of size on purpose.

Click to enlarge; copyright Gert van Dijk

Here is a rough sketch in Painter11. Its smaller size is indicated by relatively large eyes and by having thinner flippers, that as a result resemble fins more (the second pair are probably too large). I also experimented with a general 'fishy' look by giving it a glistening skin. The counter-colour pattern (dark on top, pale below) is probably a universal trick to blend into the background.

Saturday, 13 August 2011

Create your own planet (using Celestia)

The theme of this first tutorial is how to produce image of a fictional planet of your own making. Personally I use two programs to do so: Celestia and Vue. Celestia was used to produce, among others, the 'satellite images' on my site. It allows you to explore the universe, and provides detailed images of just about any object in our solar system, shown with appropriate orbits, orbital speeds, etc. The program is driven by scripts that are completely open, meaning that anyone who wants to can change almost anything. The result of this is a lively community in which you will find all kinds of real rockets and artificial satellites, but also space ships and entire solar systems from science fiction. There is a 'motherlode' and a forum.

This tutorial aims at absolute beginners as far as Celestia is concerned, but you will need some experience with a suitable graphics program. At the very least you need to be able to paint, select areas and cut and paste them. Photoshop is an obvious candidate; I have used Paint Shop Pro in the past, and now also use Painter11. I am told GIMP is also good (and free...).

The planet Mars will be given a new surface, which, in the computer world, is a 'texture'. In its simplest form that is just a colour image, but additional tricks include producing a 'bump map', allowing mountains or canyons to stick out or to be recessed, creating a more powerful 3D illusion. Another trick is adding a 'specular reflection map'. With it, areas such as seas and lakes will gleam when light falls on them, in contrast to duller areas such as land. Finally, planets can be draped in 'cloud maps', making them look like Earth.

Click to enlarge; copyright Gert van Dijk

How do you design an interesting planet surface? Or, how do you draw the surface of a 3D sphere on a flat surface? By distorting it. Severely. The image above shows a sphere with a texture of the planet Furaha, along with a cylinder on which its surface is projected. Cutting the cylinder open produces the flat map in the back. Most distortion will occur around the poles, which is very visible in the image above. The arrows all point to the same part of the same continent. On the cylinder and the flat map that area looks much broader than it is on the sphere. The simplest way not get frustrated by polar distortion is to leave the poles featureless, achieved by filling it with sea.

The map above is twice as wide as it high; those are also the proportions used by Celestia, and they make good sense. The height of the map is the distance from the South to the North Pole across the surface, or half the circumference of the planet. Walking along the equator provides the entire circumference, ending up as the width of the map. This is about the simplest map projection there is, known as a 'Plate Carrée' projection. You should use sizes that are multiples of two, because Celestia wants you to. A good size for a blank map is an image of 1024x512 pixels. If ever you are ready for more, use 2048x1024 or multiples of that.

Click to enlarge; copyright Gert van Dijk

Here is a silly map of 1024x512 pixels with a few continents on it, labeled A to E. Note that B, C and D have the same shape. Let's cover Mars with it; you can download it from the above image, or make your own version (in which case it should be 1024x512 pixels!).

  1. Celestia should be on your computer. If not, download it and use it until you can at the very least find the planet Mars and get it into view.
  2. Close Celestia if it is open. Find the Celestia folder on your computer. Open it and locate the 'textures' folder. Within that is a 'medres' folder. It is filled with many planetary surfaces that you can study at will. Find the file 'mars.jpg' and have a look. It should be 1024x512 pixels. Save it, also in the 'medres' folder, but now as 'OLDmars.jpg' (in case you later want to replace your own planet with good old Mars).
  3. Now is the time to take either the silly image I provided or your own 1024x512 image. Save it in the Celestia medres folder under the name 'mars.jpg'. Don't use another size, don't use another name.
  4. Run Celestia and go to Mars. And there you are. Marvel and gloat.
Click to enlarge; copyright Gert van Dijk

You may note that there are some ridges and craters on your planet: those are the result of the bump map for Mars that is still in place. When you are ready marvelling it is time to stop gloating: the two sides do not match up. Continent A straddled the western edge of the map, and E the eastern one. Well, a map has edges, but a sphere hasn't. That simple fact tells you at the edges of the map are trouble areas. Remember that the flat map is a cylinder cut open, so the surface should be contiguous along the vertical seam. One way to do that is to use a featureless sea along the seam. But there is a better way. This boils down to cutting up the map in two halves: a western and an eastern one. Switch their positions, and the former edges now lie against one another at the centre of the image. Edit them to produce a nice continuous shape. How you cut the map into two halves depends on your graphics program. In Photoshop you can do the following (correct for CS5): Select Filter, then Other, then Offset; once there, check the box for 'wrap around' and fill in half the width of the image (which is 512) and press OK. That should do it.

Click to enlarge; copyright Gert van Dijk

Above are the results of first rearranging the squares and then editing the map. I chose to let the continents A and E fuse to form 'EA'. After you have worked on the centre of the map you can decide to revert the procedure and change the squares around again, also shown above. You can also decide not to bother, as both are equally correct.

There is a good chance that you will have noted that the continents B, C and D differed in shape on the globe, whereas they are the same on the map. The nearer the poles you get, the more pronounced the distortion is. It is extremely difficult to predict how a 2D shape will look like in 3D. The usual result is that shapes near poles tend to look pinched, i.e. many features will look like lines pointing to the pole, which is ugly and unrealistic. There are three solutions: as you may guess, the first is to fill the area with sea. The second is to muddle through: look at your latest version in Celestia and work on the flat map to correct pinching. Then save the latest effort as mars.jpg again, close Celestia, open it again as it otherwise does not refresh the map, and repeat. The third solution is the most elegant one, and requires that your graphics program can do a conversion from polar to rectangular coordinates as well as vice versa. Photoshop can do so (I learned this one from a tutorial on the Celestia forum). In Photoshop this transformation makes the rest of the map fuzzy, so it is best to use it with only part of your map:
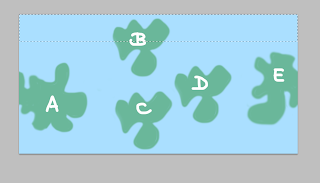
- Select the top area of your map as above: the entire width, and roughly one quarter of the height.

- Copy this as a new image and jot down its size (for instance 1024x142, or 1024x199, etc). It should look like the one above.
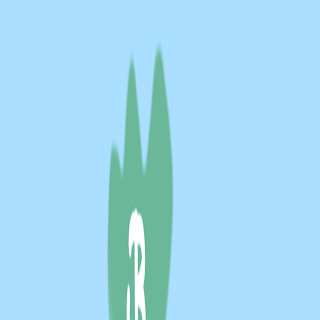
- Transform this into a square of 1024x1024 pixels ('Image', then 'Image size', uncheck 'constrain proportions', change the vertical pixel size to 1024, OK).
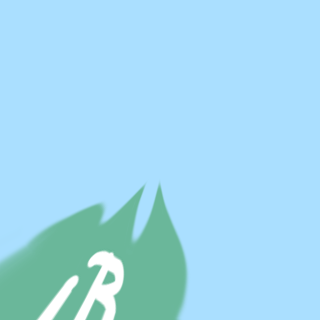
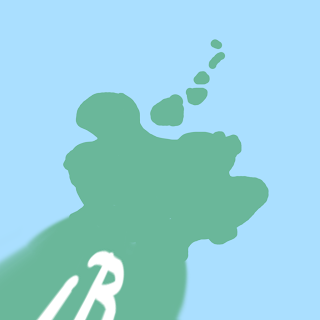
- Go to: Filter; Effects; Distort; Polar; select 'rectangular to polar' and press 'OK'. This results in a new square image as if you are looking down at the pole. That is the top one of the two above. Edit it at will, resulting in something like the one above.
- When ready, all the steps should be reversed. First revert the polar distortion: go to Filter; Effects; Distort; Polar; select 'polar to rectangular' and press 'OK'
- Give the square its original rectangular size again, which you had jotted down (use the same route: image; image size, etc.)
- Select the entire rectangle and copy it to memory
- Go back to your world map and paste the edited polar area in your map in the right area at the top.
- If need be, merge layers so you can save it again as 'mars.jpg'

Click to enlarge; copyright Gert van Dijk

The map looks rather different now, and in Celestia there is no more polar pinching! For the south pole you can rotate the world map by 180 degrees so the south comes out on top.

If you can handle seams as well as prevent 'polar pinching', you are well on your way. I may need to do another tutorial on how to design suitable colour textures, bump maps and specular reflection maps. Do not forget that there is quite a bit of material on the Celestia Motherlode, on textures as well as on many other things.

Click to enlarge; copyright Gert van Dijk

Here is a picture made with Vue of the same globe. I added a bit of 'bump mapping' and some reflectivity. There is a free version of Vue 9 that hasn't got all all options, but you can definitely make images such as this one with it. Those who wish to experiment will find it here.


Click to enlarge; copyright Gert van Dijk

I prefer Celestia for images with a realistic astronomical view. For other illustrations Vue is nice; here is a model of Furaha with a colour map, bump mapping, with a grossly exaggerated height, and different reflectivity of sea and land areas.

Saturday, 30 July 2011

Ballonts under pressure (Ballonts IV)

The previous post dealt with the physics of balloons, with an eye on what it would take to design a viable animal using a lighter than air approach. The main thing that emerged, not very surprisingly, was what makes a balloon work is the difference in density between the gas inside it and the air outside it. It was also clear that balloons below a certain size do not even get off the ground; bigger is better for balloons. And that could raise difficulties, for how do big ballonts breed if not by producing little ones?

Click to enlarge; copyright Gert van Dijk

Seeing how small ballonts cause trouble, here's one painting in the Furaha collection with small ballonts. It was destined for oblivion regardless of whether the ballonts it showed could work. It was an early painting; the hexapod (Caeruleacornu rubrum) is much too insectile and I don't like the colours or the composition anymore. The 'balloon tree' (Mollum trisiphonitum) is a mixomorph making use of sunlight to create little hot spots in which interesting thermal reactions take place. That gave me a nice excuse to paint half-transparent bubbles, always a nice thing to do. Molla (that would be the plural of 'mollum') launch their young into the air in the form of a larvae suspended from a balloon sac. The adult mollum blows gases into the sac, forcing it upwards through one of its siphons. Once the sac pops free, a valve between the sac and the larva closes, and the larva drifts off into the wild blue yonder (or hither, as the case may be). The larva is supposed to crawl around a bit before becoming sessile for the rest of its life.

As you can see, the mollum contains some of the ideas mentioned in the comments on the previous post, such as using a ballont for just one stage on a being's life cycle, or having it produced by an adult. What it also shows is the kind of ballonts I would have liked to have, i.e. fairly small ones... Oh well; what remains to do now is to play around with all the factors in the ballont equation to see how we can get as big as body mass as possible with as little a sac as possible.

A thinner membrane
In the calculations the membrane consisted of a Mylar-like substance. The Mylar party balloons you see everywhere use metal to resist gases diffusing through the Mylar. Whether animals can do that as well is uncertain, but, as fishes face a similar problem with swim bladders, and their sealing method works. I looked at spider silk to see if that would be better, but its density is about the same as that of Mylar. I did not dare to make the membrane thinner than 0.1 mm, which I thought was stretching it already (sorry about that one...).

Change the gas in the balloon
The lighter a gas is inside a balloon, the better, and hydrogen is as light as it gets. About the only way to get less mass would be to heat the hydrogen: after all, hot air balloons float because one cubic meter of hot air weighs less that one cubic meter of colder air. Does heating hydrogen make a difference? The 'ideal gas law' nicely describes the relation between pressure, volume and temperature of a gas. After expanding the ballont model a little bit the model allowed a calculation how much mass of hydrogen could be saved to fill a balloon with a 1 meter radius for a range of temperatures. This is what came out: this hypothetical balloon could lift 4.8519 kg with the inside and outside both at 15 degrees centigrade. With hydrogen heated to 25 degrees less hydrogen was needed to get the same pressure and so the balloon could lift more: an additional 12.4 grams, to be precise.

What!? A bit more reflection clarified why this was so. A hot gas requires fewer molecules to exert the same pressure as a colder gas, and the differences in the amount of molecules needed determines the difference in mass, i.e. how much it lifts. But hydrogen weighs so little that the reduction doesn't amount to anything. It does if you are dealing with a heavier gas such as air. In air, there's not much point in using a hot hydrogen balloon. By the way, those designing their own ballonts should make certain that the bladder is filled with hydrogen only. Water vapour is much heavier than hydrogen, so the bladder should not be 'contaminated' with it!

Change the composition of the atmosphere
Adding heavy gases to your atmosphere will increase how much mass a ballont can lift. Earth air largely contains nitrogen and oxygen, but there are heavier gases. The real heavyweights are noble gases such as krypton (3.7 kg per cubic meter) and xenon (5.86 kg per cubic meter). Radon is even heavier but radioactive. You can dream about replacing half of the nitrogen in the Earths air by xenon: the density of the air would increase 2.4 times, and so would the lifting power of a hydrogen-filled ballont. The snag is of course that heavy elements are very rare in the universe, so such an atmosphere would make little sense. Some other gases might help, such as chlorine, sulfur dioxide or benzene. Large amounts of those would create a nice atmosphere for ballonts. Do not ask me to design a biochemistry to make such an atmosphere probable; I would not know.

Change atmospheric pressure
Another way is to increase atmospheric pressure. Gases can be squeezed, and the physics aren't complicated. Say a given volume of air on a planet X would have a mass of 1 kg; the same volume of hydrogen might have a mass of 0.1 kg. That leaves 0.9 kg to lift something with. Now we increase the pressure twofold. The same volume of air now masses 2 x 1 = 2 kg, and that volume of hydrogen masses 2 x 0.1 = 0.2 kg. The difference now is 1.8 kg, also doubled. So atmospheric density has a linear effect on liftable mass.

Click to enlarge; copyright Gert van Dijk

The graph above shows liftable mass; see the previous post for how that was arrived at. Start at the line for 1 atmosphere (that is Earth itself). If you increase the radius of your balloon, the liftable mass rises, and more so for as the radius increases. We knew that. Go to the next line, one for two atmospheres of pressure, and you get a similar curve. It is just higher.

Click to enlarge; copyright Gert van Dijk

The image above does something similar. It builds on the balloons in the previous post. Under '1 atm.' (that would be Earth) there are two balloons, one with a 0.5 meter radius and one with a 1 meter radius. Underneath are slung the bodies they can just lift. Now let's see what happens if we decide that we want balloons to lift these same bodies, but under a higher atmospheric pressure. The balloons get smaller, but not as much as you might think or wish. For instance, the balloon that had a one meter radius under one atmosphere of pressure can have a radius of 79 cm under two atmospheres of pressure (that radius defines a sphere with half the volume of the with a one meter radius - with twice the density, the mass is the same; see?).

No matter what you do, that third power effect of radius conspires against having small ballonts. I think that I will delve into the possibilities of atmospheres with hundreds of times the pressure of Earth in a later post. That should do justice to 'Jovian floaters'; in the New Hades bookshop you will find that they were supposed to be so common in every gas giant as to be boring. We'll see.

You can of course keep on increasing atmospheric pressures even on a terrestrial planet, but there will be consequences; there always are. Think of wind forces, think of hothouse effects; there are probably lots of other effects. One is 'drag', or the force that resists moving through fluids or gases. If you want a ballont to move against the wind, you will want as small a bladder as possible to reduce drag. With an enormous bladder all a ballont can do is float with the wind, against which resistance would be futile. In a dense atmosphere the bladder would be smaller, making a self-propelled ballont more feasible. But drag also increases with density; as I said, there are always complications, even in a simple Newtonian universe.

In the past I had worked on the physics of ballonts a bit but not in detail. Those earlier efforts had made me settle on a pressure of about two earth atmospheres for Furaha. Two atmospheres is about what you get with a depth of 10 meters of water on Earth. Human bodies can adapt to that, as evidenced by underwater habitats. I did not dare, then or now, to go higher for fear of the consequences. What the current more detailed analysis yields is that smaller ballonts are, how to put it, exempt from existence.

But large ballonts will stay, at least for now. How Furahan ballonts breed and what their evolutionary history is are things that need quite a bit of reflection. I would not be surprised if regular commenters solve these issues long before I ever get round to them...